How I Made a Brass Gallery Rail from Lamp Parts
When we were designing the custom-built-in in our breakfast nook, I knew that I wanted to add a gallery rail to our wood shelves. However, when I was sourcing the gallery rails that designers are using, I was taken aback by the price. I did not want to spend over $200 per shelf to create this look, so I put that project on the back burner. Recently, I found these brass lamp parts that work perfectly to create the gallery rail of my dreams! Who knew that you could make a brass gallery rail from lamp parts?!
This post may contain affiliate links that, at no additional cost to you, I may earn a small commission from. Read the full privacy policy here.

Watch the quick DIY on TikTok!
What Is and Why Add a Gallery Rail?
Gallery rails are decorative railings, sometimes even functional, that were traditionally used on shelves or furniture to keep things from sliding off. You can see them often in vintage hutches or beautiful classic English kitchens. Over time, it has gained popularity because of its charming aesthetic that elevates any space. It is a small touch that adds so much character, especially when paired with warm wood accents.

We wanted to add a gallery rail because of the vintage charm it adds to any space. It fits the cozy cottage feel that we are trying to give our home.
All the Supplies You Need ( & links!!)

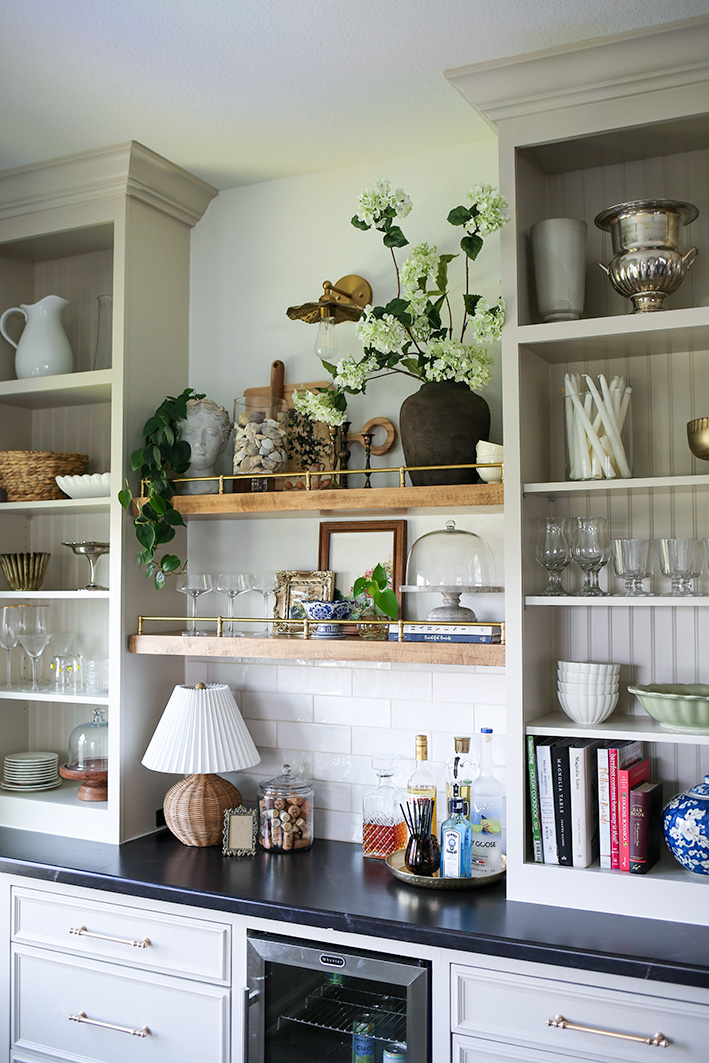
I’m basing this design on the solid wood shelves we installed in this space a few years ago. They’re made of solid maple and are just under 2 inches thick. I wanted a clean, hardware-free look underneath, so we used a dowel system to install the gallery rail directly into the top edge of the shelf.
What makes the lamp parts perfect for this project is that they’re fully threaded, which allows for a snug, secure fit. The hollow centers also work beautifully with the dowel method, making it all come together seamlessly.
You will need to do some math and placement before ordering your parts, as the rods come in different sizes. Our shelves are about 42″ wide for reference.
Also note: everything looks better in an odd number for styling. I would make sure that you have an odd number of posts total for your gallery rail.

Supplies
- Rods (10in Long – 1/8ips Thread (3/8in O.D) Threaded Pipe Stem with 3/16in long thread on both ends – Unfinished Brass)
- Posts (1/8ips – 5/8in X 1-1/2in Turned Brass Neck – Unfinished Brass)
- Tee Post Cap (1/8ips Threaded – 5/8in Diameter Tee Fitting Ball Armback – Unfinished Brass)
- End Post Cap (1/8ips Threaded – 7/8in X 5/8in 90 Degree Ball Armback – Unfinished Brass)
- Dowel Rod (we used a 5/16″ dowel rod and cut it down into smaller pieces)
Tools
- Drill
- Tape Measure
- Miniature Combination Square
How I Put it All Together
This little project is relatively easy! We went ahead and cut our dowel rod into 10 different 1.5″ pieces.


We started by fully assembling the gallery rail first so we could map out the exact placement before drilling. When making the gallery rail, work left to right. Start by creating an end post, then attach a rod, then a tee post, and so on until you reach the end of your gallery rail, where you will finish off with another end post.
I decided to have the center of the posts for the rail 3/4″ from the edge of the shelf. There is no right or wrong placement, so feel free to place your rail wherever works best for your space!

Once we knew how far from the edge each post needed to be, Robby marked the center of the shelf width and used a 5/16″ drill bit to create a hole 1/2″ deep that would create a snug fit for the dowel.


Next, we placed the gallery rail onto the dowel; this way, we would know precisely where each post hole would need to be. Then we marked those lines using the miniature combination square.
After that, all we had to do was drill out a hole for each dowel and then place the gallery rail on top.

We repeated the process for the second shelf, and then it was time to admire our gallery rail!
Gallery Rail Cost Breakdown
We do everything on a budget around here, and most of the things I share are budget-friendly. Which means, of course, we had to find the best options to create this look without breaking the bank.
So, to break it all down, we spent $66.40 on all of the brass lamp parts. Shipping was $11.75, and I received my package within 2 weeks. All in, adding all of that together and the $1.29 dowel rod, this project cost us $79.44! That’s just under $40 per shelf. Compared to the other options I had seen online that cost over $200 per shelf, this is a budget-friendly makeover!

Would I Do This Again?
Without a doubt! The charm and finishing touch that this gallery rail gave to our built-in was exactly what I envisioned in my head. Once we finally get our glass doors made for the cabinets in this space, our breakfast nook will be complete!
Let me know in the comments if you like this DIY, and if you do recreate this, tag me on Instagram! I would love to see it!