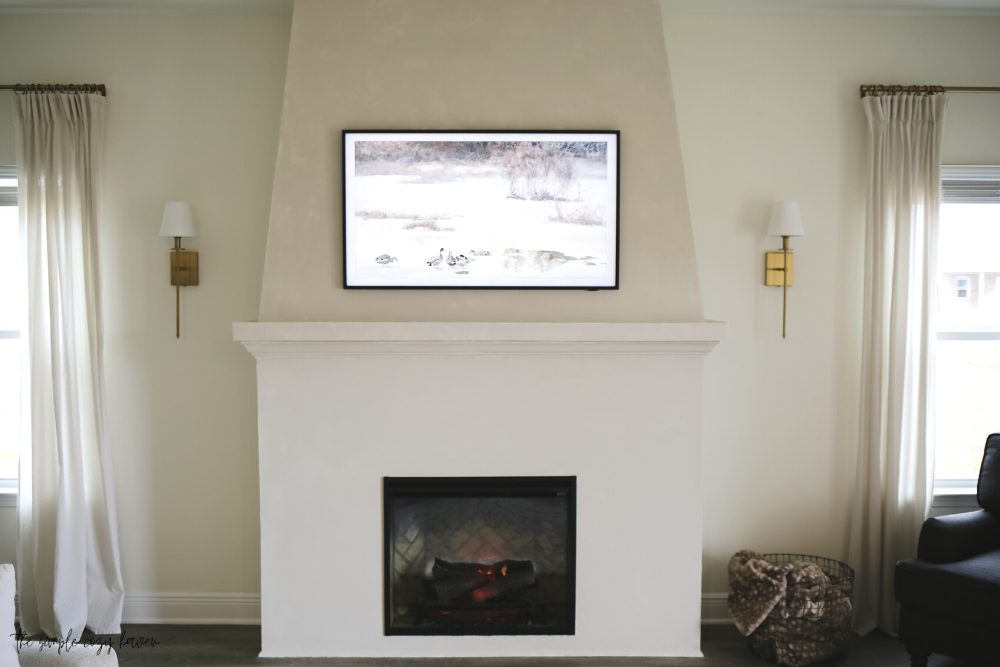
How to: DIY Roman Clay Electric Fireplace
If you are looking to add some extra cozy to your home – this project is just the one for you! This fireplace has been one that I have been designing in my mind for months! Our DIY roman clay electric fireplace is finally complete and I cannot wait to share with you how you too can build your own!

How to: DIY Roman Clay Electric Fireplace
*Disclosure: I only recommend products I would use myself and all opinions expressed here are my own. This post may contain affiliate links that at no additional cost to you, I may earn a small commission. Read full privacy policy here.
The day we stepped foot in this house I told my husband, Robby, that we had to build a fireplace in the center of the wall in our main living room. In my mind I just knew it was the way to take our new builder grade boring house to cozy and designer!
Before
Here’s a photo of the space before we got started!
How to: DIY Roman Clay Electric Fireplace
Tools, Materials, and Cost
Tools
- miter saw
- stud finder
- drill
- level
- drywall knife
- utility knife
- multi-tool (to cut baseboards)
- nail gun
- dry wall saw
- putty knives
- drywall sander
- shop vac
Materials
- 2×4 boards
- painter’s tape
- 2×6 boards
- construction screws
- 5/8″ dry wall
- dry wall screws
- corner bead
- joint tape
- joint compound
- drywall sandpaper
- painting supplies
- primer
- flat paint
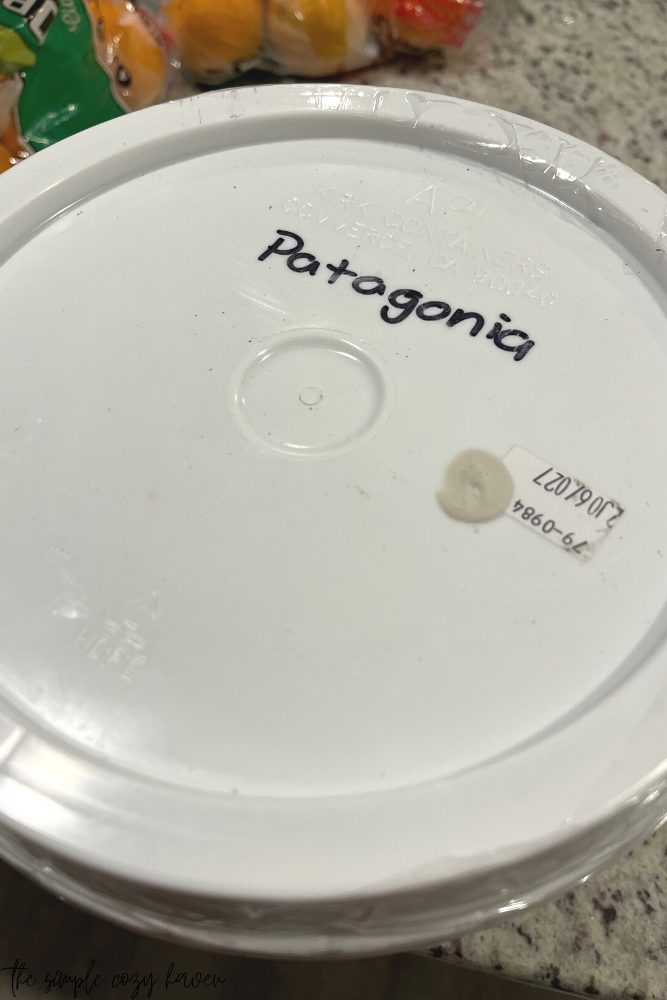
- Portola paint Roman clay (I used the color Patagonia)
Cost
Fireplace build and finishing $325 Keep in mind we already had all of the tools and some of the materials for this build but this would graciously cover the cost of all materials!
Frame TV We got ours on sale and it was only $897 This was such a splurge for us, but with creating this focal point in our home we wanted to make sure the tv did not stick out like a sore thumb. In our previous home we had a normal tv mounted on the wall and you could see all the cords and mount behind the tv as well as the fact that it stuck out about 8″ off the wall. The Frame TV eliminated all of that and the art option is such an added bonus!

Dimplex Revillusion electric fireplace The price seems to fluctuate but when we purchased, it was $1,206. I wanted to have a gas fireplace but it wasn’t something we truly felt necessary for our home. Living in south Alabama, we have mild winters so heating the house with the fireplace was not a goal of ours. This project was mostly for aesthetics.
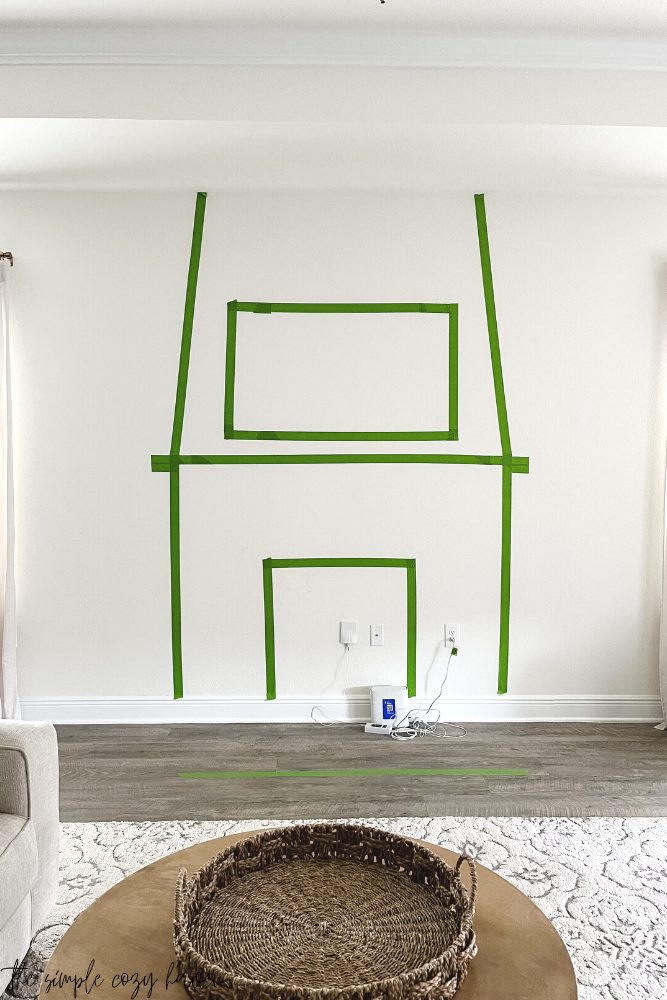
Create a mock up with tape
With any project you are thinking about undertaking I HIGHLY recommend that you get some painter’s tape and create a size mock up. This will prevent you from buying or building something either too big or small. Scale is everything!
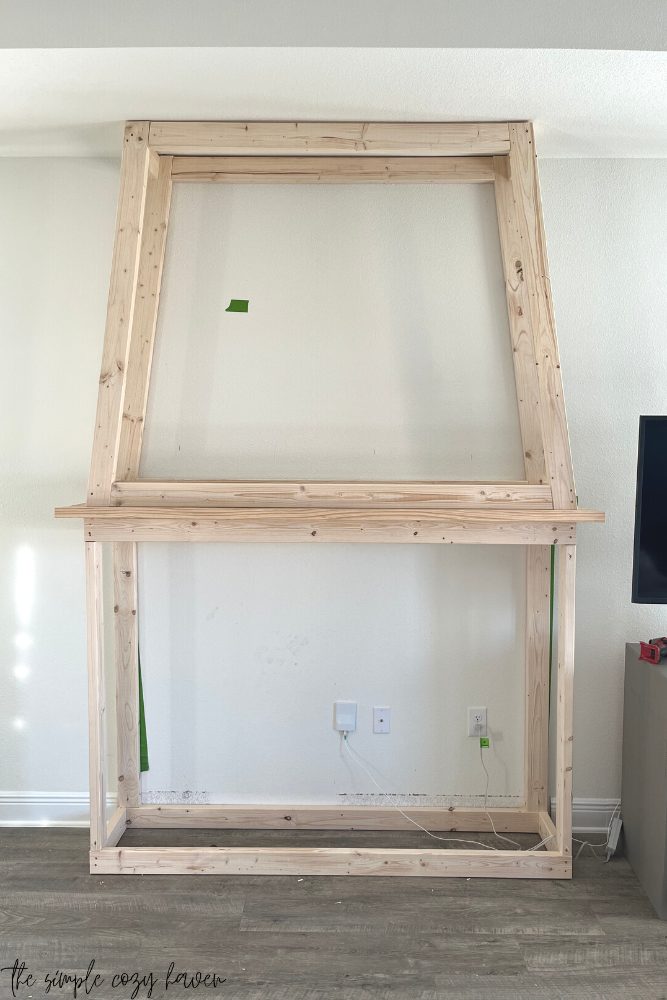
Between our windows in the living room we have about 12.5′ of wall space. I had decided that we should do a 6′ wide fireplace that way it would be a statement but not too small where we felt it needed something else.
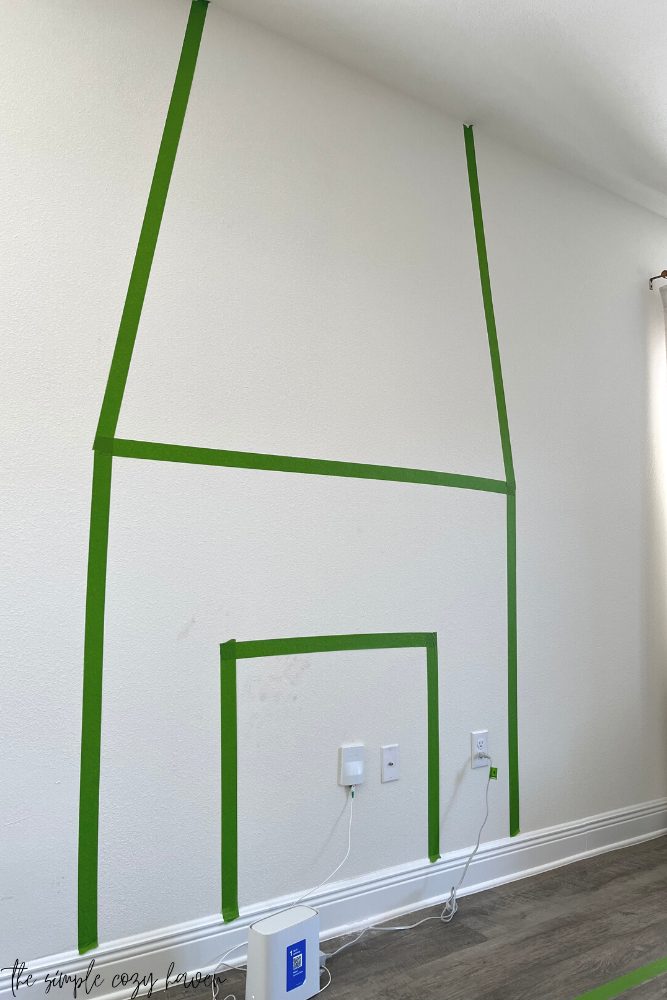
The electric fireplace insert we chose was just over 30″. We marked the center of the wall and then used the painter’s tape to create the insert, and then we mapped out the sides of the fireplace.
I did some research on how tall mantles are to get the industry standard, which is about 4.5′. This ended up being exactly half the height of our walls.
With the style of mine, I wanted the edges of the mantle to be wider than the base. We made a 3″ ledge around the fireplace.
For the angled sides we tested out a few different angles to decide which one we liked the best. We settled on a 7 degree angle. It was perfect for our 9′ walls.
Find and Mark the Studs
Go ahead and mark the studs on the wall that way you know where to secure your fireplace frame to when the time comes!
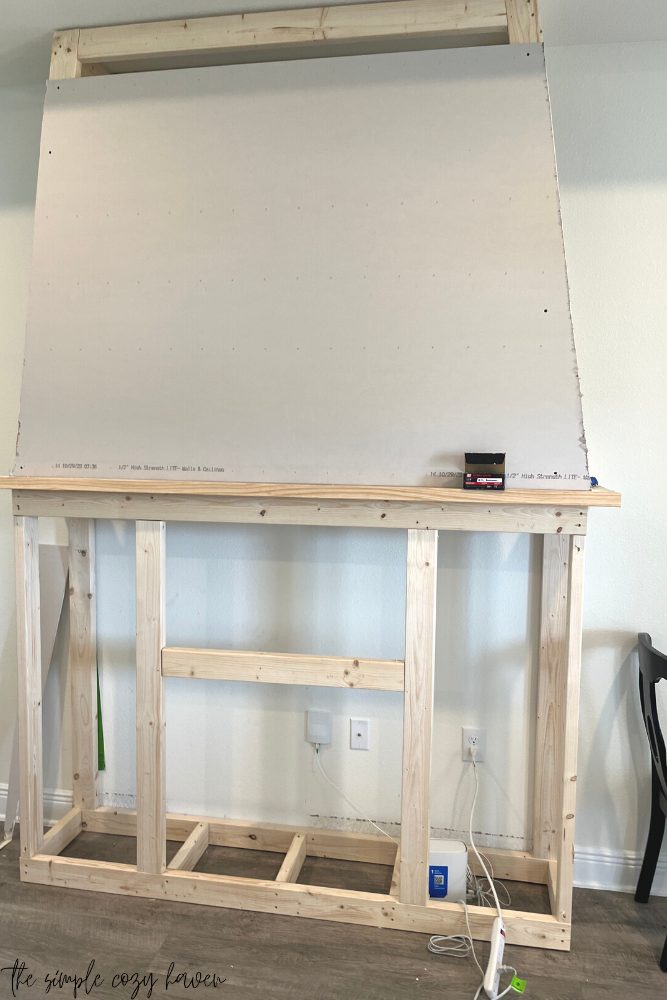
Build the Frame
Once you know what your dimensions will be, you will probably need to cut your baseboard and remove it. A multi tool works great for this. Make sure to score the caulk line that way you don’t risk tearing up your drywall.
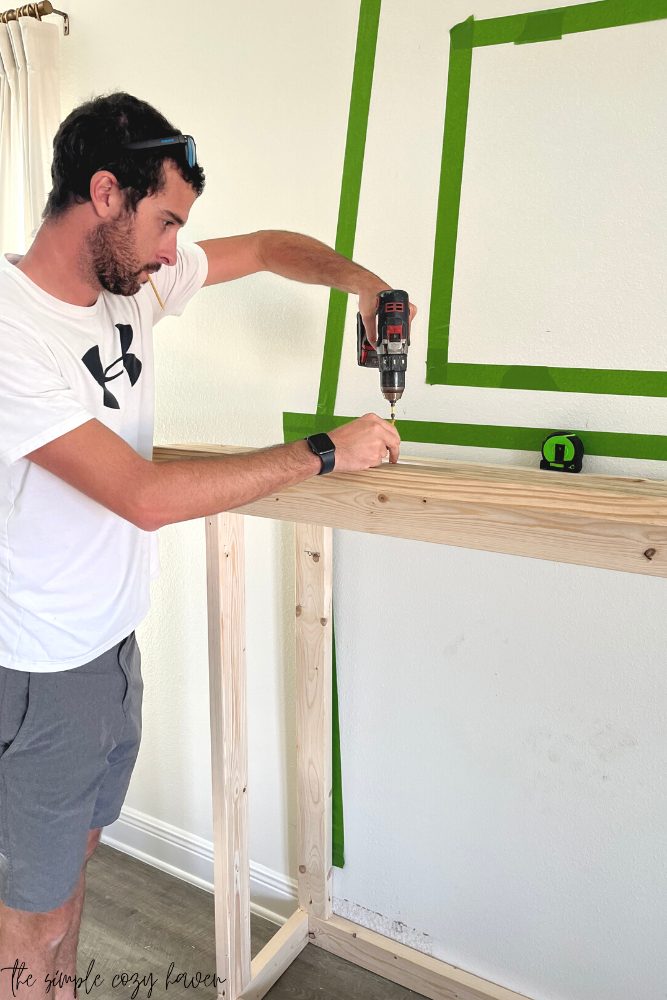
Using 2×4’s build out your frame accounting for the 1/2″ drywall you will be attaching on all sides. Depending on which fireplace insert you pick, there may be different ways you need to build the frame for it. Follow manufacturer directions.
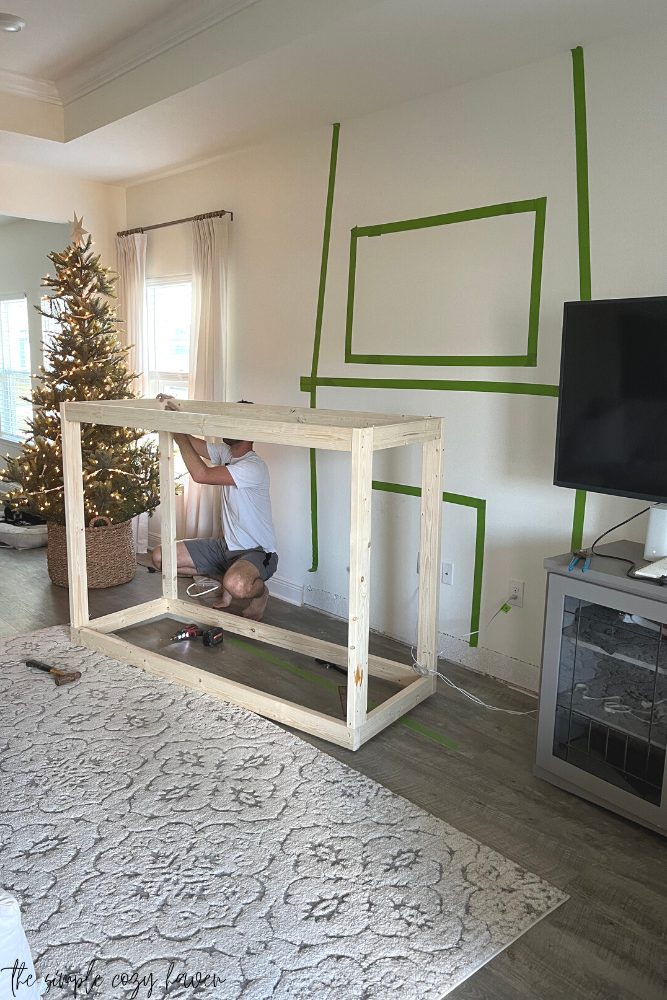
If you have a Kreg jig for pocket hole screws this is a perfect time to use it, otherwise, you can just directly screw the 2x4s together. My husband didn’t want to waste time with pocket holes so he just positioned the screw head on and then once he was halfway in he would maneuver the screw to be going diagonally into the other 2×4.
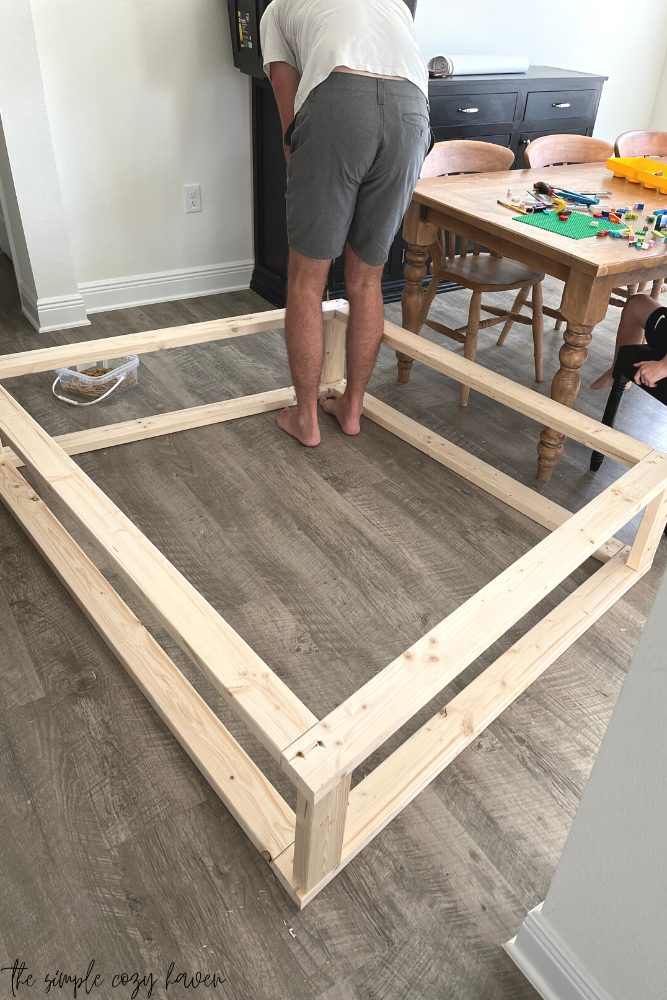
We wanted our fireplace insert to be just slightly off the floor but you could design it however you wanted.
We used 2×6 boards to create the mantle. We offset them on top of the base frame and screwed them down into the frame.
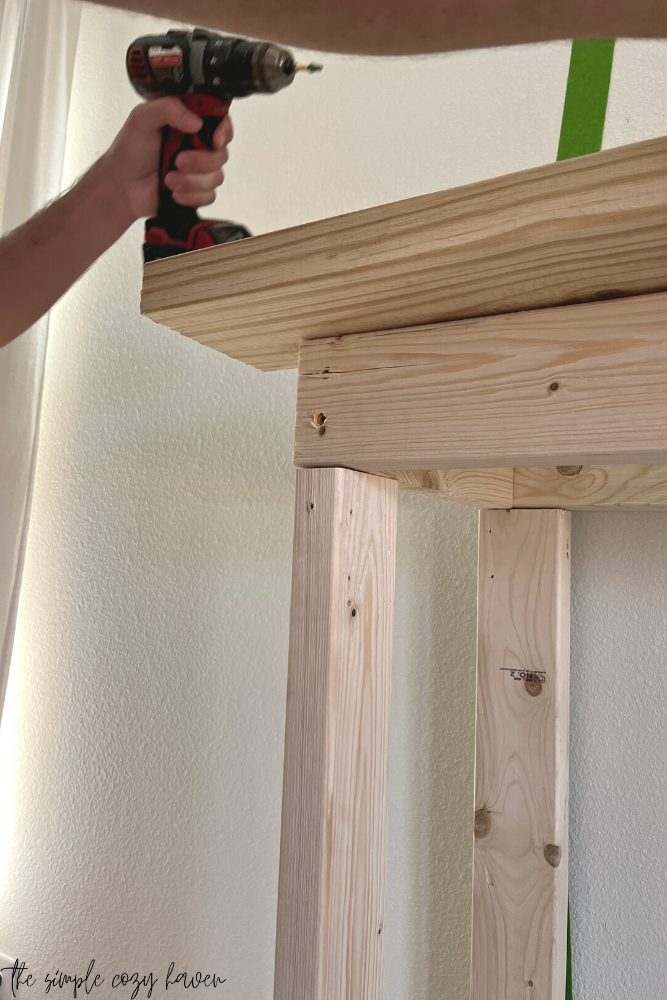
When you are cutting the angled pieces you need to make sure that you cut each end opposite of each other that way the top and bottom will be flush against the wood underneath and the ceiling respectively.
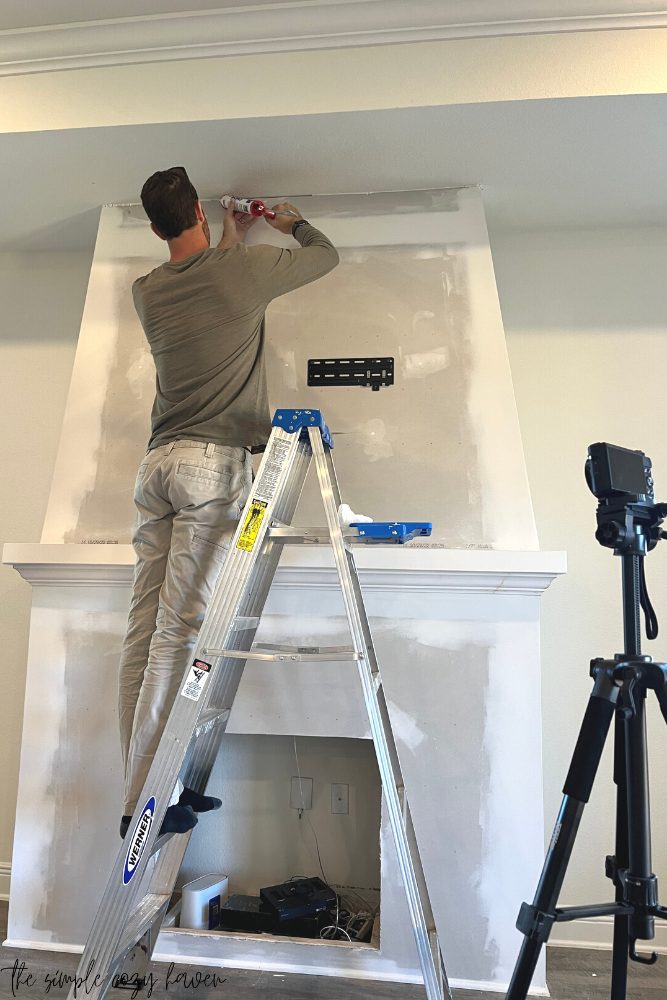
If you plan to mount a tv, make sure to create studs for your mounting hardware! I can’t find any photos of this phase but we added both vertical and horizontal supports for strength.
Once the frame is built, make sure that everything is level before you secure it to the wall. You may need some shims to put between the wood and the existing wall and floor to make it level.
And as always make sure the frame is secured to the studs in the wall!
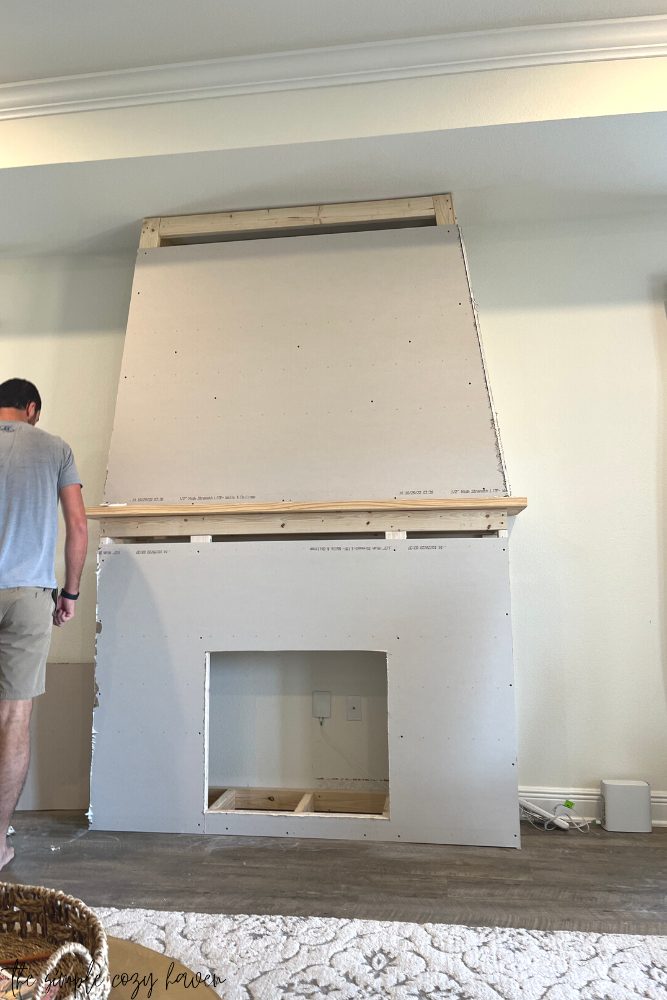
Drywall
Because our fireplace insert does not create the amount of heat that a gas or wood burning fireplace would we were okay to use normal drywall for this project. If you are creating this around a gas or wood burning fireplace be sure to look into the building and fire codes for your area.
Because Roman Clay requires smooth walls we wanted to make sure we had as few seams as possible so we used as large of pieces as we could.
Using dry wall screws we attached the drywall to the 2x4s.
To cut out the opening for the fireplace insert we used a drywall saw to follow along the frame.
For cutting down the sides we scored the drywall with a utility knife using a straight edge and then snapped it along the score line. It wasn’t perfect but we made it work!
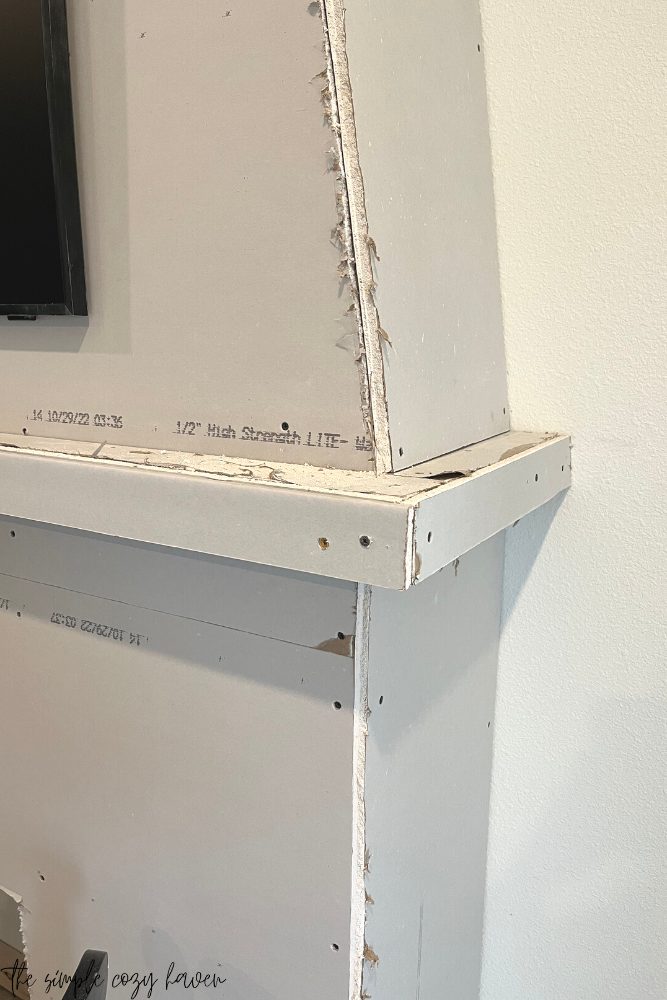
Once the drywall pieces were up it was time to add the vinyl corner bead. This was definitely something new to us. We used some extra drywall screws to screw in the corner bead – technically this isn’t how the pros do it but it’s what he had on hand.
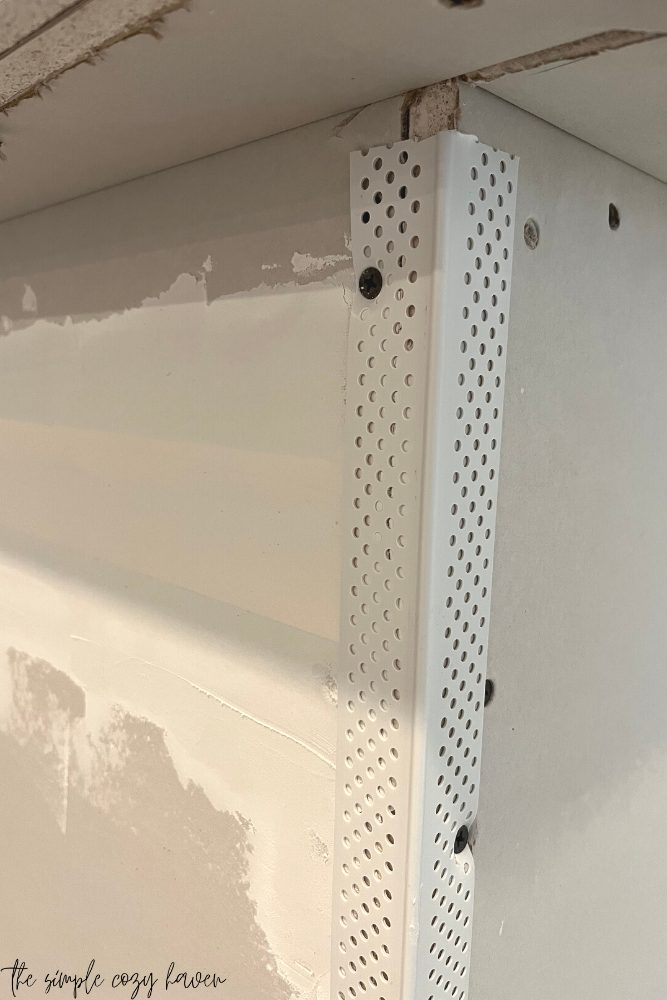
Once the corner bead was done it was time to mud and tape the seams, fill in corners, and fill where the screws were.
Using a 5″ putty knife we put on a thick first coat that way we could sand it down and then start with the lighter more precise coats. We let each coat dry for at least 24 hours before we sanded everything smooth and re-applied.

During this time we also added crown moulding under the mantle to give it a hint of traditional design. I wasn’t sure about this at first but it pulled the entire thing together! We used a nail gun to attach it to the drywall and filled the holes with plastic wood.
We finished it off with some base cap trim around the bottom. We caulked all the seams where the crown moulding was and where the fireplace met the existing walls.
After about 5 coats it was finally time to seal the drywall and prime. I used the BIN primer and did 2 coats with a 1/4″ nap roller.

I felt that the primer was too slick for the roman clay so I gave the entire fireplace an additional coat of flat white paint. Once the paint was dry for 24 hours it was finally time for the last step!
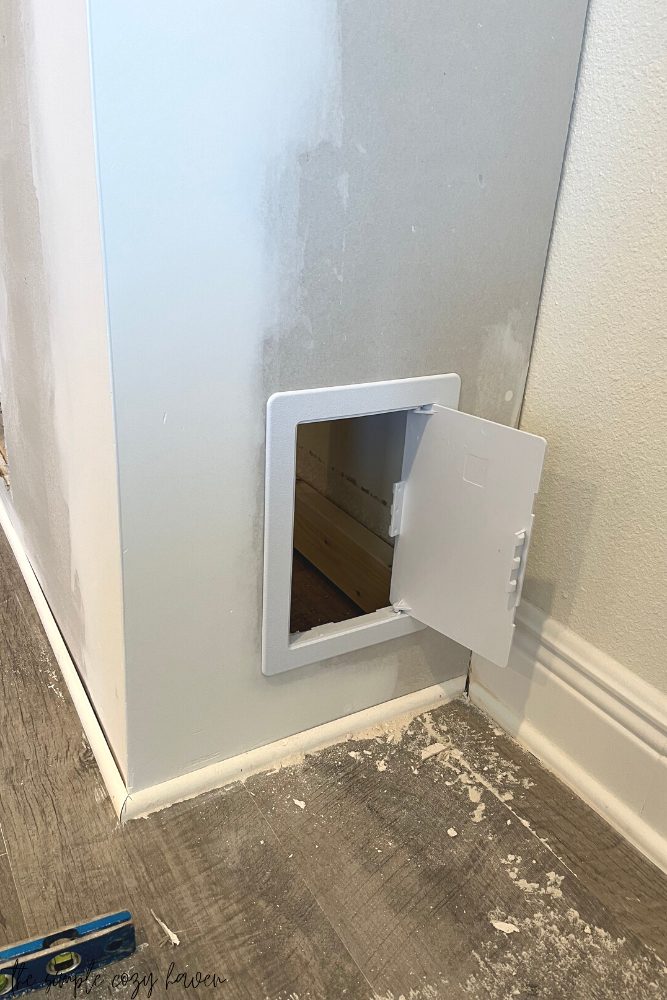
Access Door
On the side of the fireplace, we added an access door that allows us to reach anything behind the fireplace. We can plug things in and access our DVD player if ever needed!
Roman Clay
This was my favorite part of the project. I was introduced to Roman Clay a few years ago and have been dying to get my hands on some to try.
Portola Paints offers a wide range of colors for roman clay and to be honest, picking out a color was harder than I originally imagined.
After searching on Pinterest and Instagram for photos of real life examples we decided on the color Patagonia. It truly was exactly what I was envisioning!
Roman clay has a thicker consistency than paint but much more liquid than joint compound for instance. To apply it I used a 4″ putty knife and you just scrape the product on a little bit at a time. The goal is an organic look so I was sure to move the product around in all sorts of different ways. I would make an ‘x’ and add in ‘s’ motions. It looks a little crazy at first but stick with it!

On the moulding I just used my fingers to apply the clay.
After a thin first coat, I let it dry overnight. The next day I sanded it down in a few spots and then repeated the process.
This process went much smoother than I had imagined it would be. Here is a photo when the second coat was drying.

Installing fireplace insert
Once we were done with the fireplace it was time to install the insert and turn it on!
The Dimplex Revillusion is so easy to install. Once Robby wired a plug onto it all we had to do was slide it into place. We secured it using screws fastened into the interior mounting tabs.
Review after 1 month
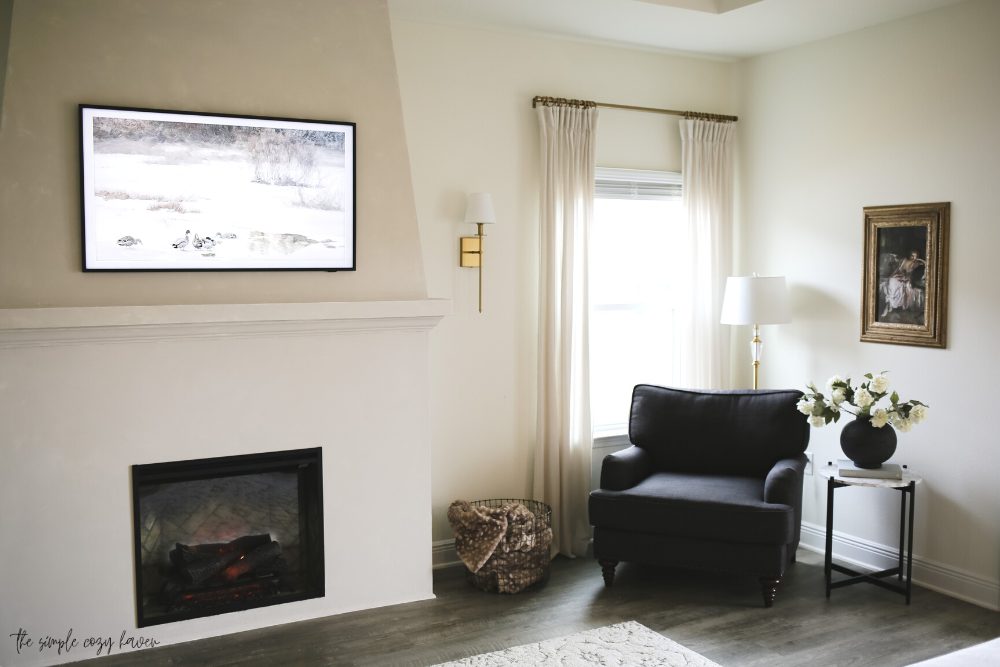
I absolutely love this fireplace and cannot recommend it enough! It looks so realistic! Even family and friends have commented on how nice it looks compared to other electric fireplaces they have seen. It truly was the perfect choice for our family.
Dimplex really nailed it with their 3 part design. On the front they have 3D logs and rocks that glow when the fireplace is turned on. Behind that is the projection screen which puts off a beautiful flicker of flames, and behind that is another set of logs with a glow behind them.
What I love most about this fireplace is that we can turn on the flame and enjoy the ambience without the heater running. Sometimes we just like to enjoy the beautiful glow of our fireplace at night even with the AC cranked down!
Overall, we are completely satisfied with our purchase and we may or may not be thinking about adding another Dimplex Revillusion to our bedroom one day!
How to: DIY Roman Clay Electric Fireplace
Would you build this fireplace in your home? Let me know in the comments below!
As always, follow me over on Instagram to see the daily happenings and projects in real-time! Thanks so much for being here!